Quick answer
The console still runs GTA 6. A capture card sends its video to your PC, where Veyra or similar software can insert generated frames for smoother display. A 60 or 120 FPS PC preview is not the same as native 60 or 120 FPS console gameplay.
What 60–120 FPS on a PC screen actually means
This setup does not install a Windows version of GTA 6. Your PlayStation 5 or compatible console runs the game normally. A capture card sends its HDMI video signal to your PC, where an application can upscale the image, apply optional neural enhancement, and interpolate extra display frames before showing the result on your monitor.
Consider a game producing 30 unique frames each second. A 2× interpolation setting can produce an approximately 60-frame-per-second video output; 4× can target around 120 displayed frames per second. Those added frames are estimates generated between real console frames. They do not make the console simulate the game at 60 or 120 FPS, increase the rate of controller input, or guarantee less latency.
That distinction matters more than any FPS counter. You may see smoother movement on the PC display, but input response still depends on the console, capture card, processing pipeline, and display.
What you need before starting
- A PlayStation 5 or other supported console running the game. This method is not a substitute for a native PC release.
- A capture card that accepts the console's HDMI video and exposes a usable video input to your PC. Check the card's actual capture resolution and frame-rate limits, not just its advertised HDMI passthrough specifications.
- A Windows PC with sufficient GPU capacity for the filters you intend to run. NVIDIA VFG is an NVIDIA-specific option; alternate frame-generation backends depend on the app version and the GPU.
- A 60 Hz or 120 Hz monitor, depending on the generated output you want to view. A 120 FPS stream cannot be fully displayed on a 60 Hz screen.
- Suitable HDMI and USB cables, working GPU drivers, and an audio route you can monitor without echo or delay.
A practical 1080p setup can be easier to stabilize than a heavily processed 4K pipeline. There is no requirement to buy an expensive 4K capture card merely to try this technique.
Step 1 — Connect the capture card
Connect the console's HDMI output to the capture card's HDMI input. Connect the capture device to your PC using its supported USB or PCIe interface. If the card offers HDMI passthrough, you can also connect its HDMI output to a TV or monitor for direct, lower-latency console play.
If you get a black picture from a PS5, check Settings > System > HDMI > Enable HDCP. Capture cards generally cannot ingest a protected HDMI signal; turning HDCP off for gameplay capture is a documented PlayStation setup step. It does not grant permission to capture protected movie or streaming-app content. Follow the capture card manufacturer's instructions.
Step 2 — Install the processing app carefully
The demonstrated interface is from Veyra-NRVideo, a third-party Windows capture and video-processing project. It is not a Rockstar Games tool, a PlayStation performance mode, or an official GTA 6 PC port.
Review the project's current documentation and release notes before downloading. Choose a package compatible with your GPU and Windows setup, obtain it from the project owner rather than an unrelated mirror, and inspect software security warnings instead of disabling protection indiscriminately. Feature names and supported backends can change between versions.
The project documents a pipeline that brings in capture video, applies optional enhancement and upscaling, and performs frame interpolation for PC playback.
Step 3 — Configure the captured video input
Open the capture source selector in your processing app and choose your actual capture card. Set the capture resolution to a mode the card genuinely supports, such as 1920 × 1080 or 3840 × 2160. A larger output setting does not recover detail that the capture device never received.
Next, match the source-frame-rate setting to the incoming video signal. This may differ from the game's actual unique-frame cadence. For example, a 60 Hz HDMI signal may carry repeated frames from a 30 FPS game. Confusing the HDMI signal rate with the game's rendered FPS can produce poor frame pacing.
Leave pixel format and color settings on a supported automatic or default option initially. Select the audio device associated with your capture card and verify that game audio and video stay in sync before enabling extra processing.
Step 4 — Start with 2× frame generation
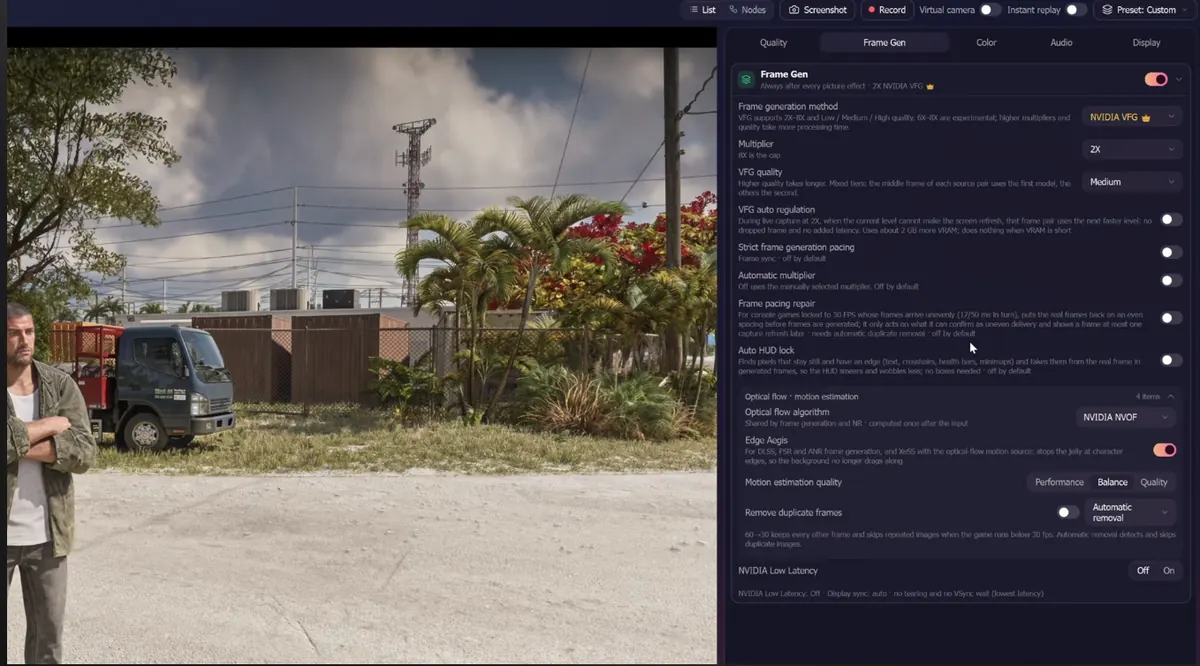
Start the capture preview with effects disabled. Once the ordinary video feed is stable, open the Frame Gen tab. The supplied screenshot shows NVIDIA VFG selected, a 2× multiplier, and Medium quality. These are example controls from that version of the application, not a universal preset for every GPU.
Try a 2× multiplier first. If your source is genuinely updating at 30 unique FPS, this targets an approximately 60 FPS displayed stream. Look for consistent motion rather than relying only on a displayed number.
Only then experiment with 4× output and a 120 Hz display. Some combinations may generate more frames than the GPU can deliver smoothly. More interpolation can also increase latency, edge artifacts, duplicated objects, or uneven motion around moving people and vehicles.
Use the frame-generation backend supported by your GPU and the installed application release. The screenshot's NVIDIA VFG selection is not evidence that identical NVIDIA functionality works on AMD or Intel hardware.
Step 5 — Add upscaling and image enhancement selectively
Upscaling and frame generation solve different problems. Upscaling changes the displayed resolution, while interpolation creates additional display frames. Neural enhancement can also alter image detail, especially around faces, reflections, vegetation, and fine textures.
Start with the captured image at its native resolution, compare it against a lightly upscaled output, and enable one additional feature at a time. Avoid stacking aggressive filters just because the options are available. Overprocessing can make facial features look unnatural or introduce temporal shimmer.
If performance drops, disable enhancement layers before raising frame-generation multipliers. GPU load, VRAM use, capture bandwidth, and output refresh all limit what your setup can sustain.
Step 6 — Record or stream the processed picture with OBS
If your processing app offers a virtual camera output, enable it and add that device in OBS Studio using Sources > Add > Video Capture Device. Select the virtual camera rather than the original capture card if you want the processed video in your recording.
Alternatively, add the physical capture card directly in OBS to record its unprocessed signal. Test audio routing separately: virtual video devices do not always carry the same audio stream. Record a short sample and check synchronization before beginning a long session or live stream.
For source configuration, follow OBS Studio's Video Capture Device guide.
Problems worth checking before buying more hardware
- Black preview: check supported HDMI input modes, cables, capture-device connections, and the PS5 HDCP setting for gameplay.
- Choppy motion at 2× or 4×: lower the output resolution, disable some effects, verify source cadence, and confirm the monitor refresh rate.
- Faces or moving edges look strange: lower interpolation intensity, test a different supported backend, and compare with frame generation disabled.
- Audio is missing or delayed: verify HDMI audio output, capture-device audio selection, and OBS monitoring. Headsets attached to the controller can affect what audio reaches HDMI.
- Input lag feels worse: play through the capture card's direct HDMI passthrough if available, or return to a direct console-to-display connection. Smooth-looking output does not necessarily mean more responsive controls.
- The GPU is saturated: favor an uncomplicated 2×/60 FPS target, reduce costly neural or super-resolution options, and check VRAM consumption.
Is 120 FPS the best setting?
Not automatically. A 30 FPS source interpolated to 120 displayed frames can look more fluid, but it still contains only 30 new game-state images per second. For most setups, stable capture, acceptable input delay, and artifact-free motion are more valuable than an impressive multiplier. The best result may be native console output, a moderate 2× setting, or no processing at all.
Sources and editorial notes
This guide explains the workflow shown in a user-supplied demonstration and screenshot; it is not an independently measured benchmark of GTA 6 performance. Console FPS, end-to-end latency, software compatibility, and maximum output depend on the actual hardware and app version. The image illustrates software settings, not a verified claim that the game renders natively at 120 FPS.
For application features and version-specific caveats, consult the Veyra-NRVideo project and its settings documentation. For PS5 capture setup, read Elgato's HDCP guidance.